Author Archives: admin

ONE PAGE MINI SHOP MANUAL

Speaking of spark plugs, have you ever been engrossed in cleaning them and when it came time to set their gaps could not for the life of you remember how many thousandths of an inch was correct? A ’49 shop manual has all this sort of information, but that means getting out the manual and turning pages with your greasy hands until you come to the right place. Why not have all your ‘49’s specs and similar info set forth on one or two pages you can quickly refer to? I recently came upon the following sheet which has most of everything you need to know in the way of specifications when working on a ’49 and it is now posted on a wall in my garage. Cut it out and hang it up if you think you’ll find it useful too

image is too big to display please check out the newsletter

newsletter

TECH TIP 49 CADILLAC SPARK PLUGS

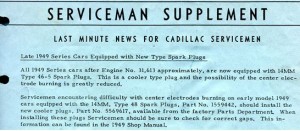
Early ’49 Cadillacs used AC 48 spark plugs, a very “hot” plug. The difference between hot and cold spark plugs is how quickly the plug body dissipates heat. Hot spark plugs dissipate heat slowly, keeping its temperature higher, which allows the plug to burn off harmful carbon deposits quickly. They are used in cars that are usually driven slowly and in stop and go traffic, whose motors frequently don’t get fully warmed up. When designating the spark plug for the new ‘49, Cadillac engineers thought most of them would be used under such conditions, but apparently this turned out not to be the case as the following 1949 Cadillac factory “Serviceman’s Supplement” explains:

jun 11 plug

So, to be absolutely authentic either AC 48 or 46-5 spark plugs can be used in early motors, but only 46-5s should be used in motors from number 31,613. Nonetheless, NOS AC 48 plugs seem to be more easily found today. Also, your motor may need a hotter plug anyway if you don’t drive much at high speeds, so you may want to stick with them. And, between us ‘49ers, how many cars show judges would know this obscure factoid anyway?

newsletter

GETTING YOUR BRAKES’ HYDRAULIC SYSTEM IN SHAPE OR STOPPING IS MORE IMPORTANT THAN GOING

by Art Gardner

Many of you are aware of the tendency these days to “update” the car’s brakes with disk brakes in an effort to make the car safer. In my opinion, the biggest danger with the original 1949 Cadillac brakes is the lack of a second circuit, not raw stopping power. Up through 1961, I think, the brakes were all single circuit. Certainly in 1949 they were single circuit. That means that if you pop a line or hose or wheel cylinder anywhere on the car, you will lose ALL brakes all at once. Dual circuit brakes, which I think started with the 1962 Cads, eliminate that risk and leave you with either front or rear brakes in the event of a calamity. Many people will say, but “hey, I have never had a problem, so why change anything.” But when you do have a problem, this is a BIG problem.

So, the most important thing, in my opinion is to make sure the original parts are PERFECT, especially the metal lines. Brake fluid is hydrophilic, meaning it attracts moisture (right out of the air). The water that gets in the lines in this way rusts the metal lines from the inside out. They can look perfectly normal in a visual inspection, but be rusting away on the inside. One day a pinhole pops though and you lose all brake pressure. This happens more regularly than you might think, which is why the government eventually outlawed single circuit brakes. This fluid-borne rust is also how your wheel cylinders and master cylinder get pitted. The fix is to replace the plain metal lines with stainless steel lines. Put on all new hoses. Sleeve the wheel cylinders and the master cylinder with brass or stainless steel. Flush out the brake fluid and replace it with new fluid every 2-3 years. Do that and the original drum brakes should be safe for a long time!

If you want to make them even safer, you can put in a dual circuit master cylinder. It takes some extra work and plumbing, but to me it is worth it for the additional peace of mind. This is what I did with my last ‘49 6107 Club Coupe and am doing it to my new ‘49 coupe. I developed a nice kit for installing such in the original mounting place on the frame, so everything looks great and works correctly. I haven’t worked out how to do this on my 1956 Series 60 Fleetwood, but I am still noodling on it (as there is precious little room at the front of the 56 power brake booster for a dual circuit master).

I tried a disk brake “kit” on my last 49 and it was a disaster. I never did get it to work right, so I gave up and went back to the reliable drum brakes (augmented by my dual circuit master kit using a modern Wilwood dual circuit master).

I drive my old Cadillac’s as daily transportation. Right now, I use the ’49 fastback in the cold months (it is black and has no air conditioning) and use the ’56 60S in the warm months (its factory air works great). So I am relying on my good old drum brakes every day to stop my cars and keep me safe.

If you use the car only occasionally, such as for club events a few times per year, you might feel less motivated to be so finicky about brakes and might be tempted to do the minimum, instead of the maximum, in restoring the brakes. I can understand that tendency. But keep in mind that, as the song says, rust never sleeps and the corrosion inside the lines and the cylinders continues whether you use the car or not. So you can still have a safety issue with the brakes, even if you only use the car a few times per year.

If you keep the single master, but make the entire system perfect, you should be okay. A dual circuit master is a nice peace of mind as an extra safety measure, but you should be okay without it if everything else is right.

newsletter

DROOPING DRIVERS DOOR HANDLE REDUX

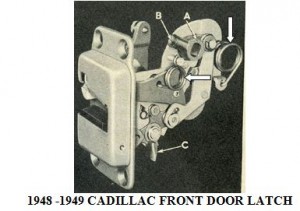
We’ve touched upon this problem in past issues of the Times, but there’s always new information coming to hand. Drooping door handles, particularly that of the driver’s door which gets more use, is an annoying problem on ’48 and ’49 Cadillacs. Referring to the photo on the next page of a front latch, it is caused by the door handle’s square steel shaft that goes inside the door to enter the square opening in a softer pot metal piece in the latch called the tumbler, indicated by Arrow A.
Over the years, constant use causes the square opening in the tumbler to become partially rounded, resulting in the weight of the handle causing it to droop. (Arrow B points to the hole in the tumbler for the door handle set screw and Arrow C to the lock plate controlled by the outside key lock.)
There are several fixes, as set forth in the next paragraph, all of which, unfortunately, require removing the door panels and getting into the innards of the door. Though this is a lengthy job, as lots of screws must be unscrewed and lots of parts removed, unless you have to deal with taking apart the door latch itself it is not technically difficult. (The larger arrows in the photo point to two difficult-to-deal-with springs in the mechanism that must be removed and replaced when taking apart the latch.) Note that convertibles and Coupe de Villes have different door latches than club coupes and sedans. The above photo comes from the 1948 Fisher “C” Body Manual for Cadillacs and Oldsmobile 98s, which has excellent, well written, illustrated step-by-step procedures for doing this type of work. They can usually be found on Ebay and I suggest you buy one.

1. The best fix is to find another door latch in better or new condition. This way you avoid taking apart the latch which, as mentioned above, can be tricky. I once lucked out at a flea market and found a brand new ’49 Buick driver’s door latch for a club coupe (such as mine) or a sedan. 1949 Buick Supers and Roadmasters as well as ’48 and 49 Oldsmobile 98s used the same door latch as ’48 and 49 Cads. In my experience Buick and Olds parts frequently sell for less than the identical Cadillac parts, so you can try dealers that sell stuff for those cars. I was recently told that in the 1948 version of the latch the tumbler is made of bronze, which is much more durable than the’49 pot metal tumbler.

2. If the car is a convertible or Coupe de Ville, ’49er Ron Brooks of Twin Lake MI makes a sturdier tumbler to replace the original pot metal tumbler, which he sells for $125 or so. His phone number is 231-821-2812.

3. For other models of ’48 or ’49 Cadillac, All Cadillacs of the ‘40s and ‘50s www.allcads.com sells a sturdier replacement tumbler for $50 or so.

While both of the above are excellent replacement parts which are far superior to the original part, as mentioned above removing the latch from the door then installing the new part is not easy and requires much patience.

jun 11 door

door 3

newsletter

IT WORKS FOR ME 8 VOLTS SOLVES THE 6 VOLT STARTING PROBLEMS

After reading the article in the March ’11 Times on 6 volt battery problems, I thought I’d share with everyone how I solved the problem. I put in an 8 volt battery. Everything stays the same. The voltage regulator is re-set to 8.6 volts, which is enough to do the job. All the bulbs are ok and when I tell her to start it sounds just like a 12 volt system. I had the same problem on a 1948 Lincoln V12 which 8 volts fixed. I’m sure there will be much controversy, but it works for me

newsletter

GET YOUR 49 OUT FOR SPRING

Greetings and salutations, my fellow ‘49ers. Supposedly, spring has sprung although we’ve only had about 5 decent days so far here in the Northeast. It’s time to get your vintage Cadillac(s) out of mothballs and ready for another season of cruise nights and car shows. I’d like to take this opportunity to thank the many well-wishers who emailed me congratulations on my new “position” and offering words of encouragement. That was very thoughtful of you and much appreciated.

I recently received a call from our friend and benefactor, Ed Cholakian, who owns All Cadillacs of the ‘40s and ‘50s. We had a pleasant chat and Ed extended his best wishes to our chapter on its 10th anniversary. Ed has been very generous in the past, supporting the ‘49ers financially, and instructed me to contact him if we need anything. Unbeknownst to me, Ed is also an official distributor for Lynn Steele rubber products and has benevolently offered to extend a 20% discount to all members of the ‘49ers. So, if you need any Steele products, please purchase them through Ed. Thanks, Ed.

About a month ago I added yet another ’49 Cadillac to the “stable”. This one’s a model 7533X 9-passenger Imperial Business Sedan, a.k.a. a limo. I named her The Countess. I plan to pen a “Pride and Joy” article on her in a future ’49 Times.
The other two members of the “royal family” are The Duchess, a ’49 Club Coupe, and The Baroness, a ’49 model 6269 sedan.

With Jay’s blessing, I’ve decided to add a couple of new features to our newsletter. One is “Welcome New Members”, fashioned after a feature that appears in each issue of The Self-Starter. The second, also starting this issue, is called “Birth Announcements”, which will welcome members’ newest acquisitions. Please email me if you recently purchased a ’48-49 Cadillac! Be sure to provide the year and model, the name of the new “baby” if you name them as I do, and any other interesting factoids about the vehicle.

Also in the works is a series of informational articles on the Hydro-lectric system which will start with the next issue of the ‘49 Times. The series will begin with a general overview and operating principles of this system and will gradually deal with technical aspects, such as testing and trouble-shooting. Once again, I urge members to please submit items of interest for possible inclusion in future issues of the ’49 Times, such as Tech Tips, stories and pics of your Pride and Joy, and anything else relevant to our passion. We need your help; we can’t do all this alone.

Finally, I spoke with Nancy Book who, along with her husband Mike, is involved with the running of the CLC Grand National to be held in Dublin (near Columbus), Ohio August 10-13, 2011. We now have a conference room reserved for a ‘49ers chapter meeting the afternoon of the judged car show, Saturday, August 13th, from 3 to 4 pm. Details of what room we’ll be in will be available at the registration desk and will also be posted on the CLC bulletin board. We need a volunteer or two to make a brief presentation, such as a tech session, “show and tell” or anything else you feel would be of interest to the ’49ers. Please make every effort to attend this chapter meeting, even if it’s just to stop in and say “hello”.

newsletter
IF YOUR REAR AXLE IS NOISY

The first thing to do is check the gear oil level in the differential. Lack of oil can cause a noise in the differential gears. It should be within a ½ inch of the upper hole and should be 80/90 weight oil. If oil is low, check your pinion seal as well as the large, round gasket where the differential meets the axle housing and the outside of your rear brake backing plates for leaks. If your pinion seal is leaking, unless you have the necessary tools and equipment it is best replaced by a professional, as the bearing and pinion nut need to be specially dealt with. The shop manual has details. The large gasket, sold by Olson’s Gaskets, can be replaced without special equipment by removing the differential, though be careful as it is very heavy.

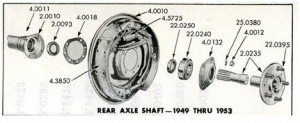
If there is a leak on the rear brake backing plates, (4.0010 in the diagram below.) ascertain whether it’s brake fluid or gear oil. If gear oil, there are oil seals on the outer ends of the axles (2.0093 in the diagram.), which when faulty will permit leaks of gear oil into the wheel area which will then drain out a hole where the axle meets the outside of the backing plate. To replace the seal, you must remove the axle, pull out the seal with a seal removing tool (or pry it out with the end of the axle) and drive the new seal all the way in with a large socket wrench or similar tool. (I can lend members my home-made tool if need be.) When you re-install the axle, spread some chassis grease on the rubber part of the seal so the axle doesn’t scrape and damage it. Such a leak can also be caused by a faulty gasket between the backing plate and the axle housing (4.0018). To replace this gasket, remove the axle, unscrew the hydraulic brake line from the wheel cylinder and remove the backing plate.

Check the axle bearings by driving the car when the noise is present. One way to tell if an axle bearing is causing the noise is to turn the car sharply in one direction and then the other. If the noise varies in intensity while doing this, it could signify a bad bearing. To replace an axle bearing (22.0240), you must remove the axle. It is not essential to remove and replace the seal at the same time, but it would be prudent to do so. The bearing must be pressed on the axle by a machine shop, being careful not to score the surface on the end of the axle that the seal rides on. (Now that cars are mostly front wheel drive, there are fewer auto machine shops that press on rear axle bearings.) These bearings and seals are sold by Olcar Bearings, Southern Pines NC for a reasonable cost, though you may find them at a modern auto parts supplier as they are standard for many cars. .
If you eliminate an axle bearing as the cause of the noise, the remaining possibility, of course, is that the noise is in the differential assembly. Assuming you’ve fixed any leak, if the noise is just a hum the differential can go for years without failing or causing any further problems, other than being annoying. (My own has been making such a noise for 20 years.) If you feel you must fix a noisy ’49 Cadillac differential, besides replacing the pinion bearing the shop manual recommends you not try to work on it and, in any case, does not tell you how to do so. Apparently, the problem is that some of the internal parts are held together by special pins that can only be removed by destroying them and some other parts nearby. The only possible fix is to replace it. Prez Joe Cutler has several ’49 parts cars and can probably sell you a good (quiet) used one.

rear axle mar 11

newsletter

IF YOUR DOME LIGHT DOESN’T WORK

don’t lose your cool, but do open your ’49 shop manual to page 201, which shows the “Circuit Diagram” of the electrical system. The dome light is powered by a “hot” (always has current in it) wire, labeled 14RXT, going to it from Terminal 5 of the headlight switch. The wire passes through a large multi-pronged male/female connection under the dash that connects to most wires going to the back of the car. In a ’49, this large plug is held to the inner firewall (under the dash) by a clip at the upper left of the inner firewall (directly in back of the hand brake mechanism). From the connecting plug, the dome light wire runs up the driver’s door post and under the headliner to the light, which is not grounded, and then to the dome light switch. When you turn on the dome light switch it grounds itself, completing the circuit and the dome light goes on.

The dome light circuit can be checked by removing the 2 screws holding on the dome light switch and its chrome bezel. Then, pull the switch with its male connection off the wire behind it which has a female connection plug. Then, attach a test light’s alligator connection to any metal ground point and poke the needle end of the test light into the female connection on the wire. The test light should illuminate; if not, that means current isn’t getting to that point and the dome light won’t work. This could be due to a problem with the large connecting plug under the dash, or the wire is broken somewhere along its length or it has become disconnected from the headlight switch.

Note that the front door opening switches do NOT operated the dome light switch on any 2 or 4-door ’49 Cadillac. An exception is that the front door switches will operate the “corner lamps” at the corner of the rear of the roof and the body on a Coupe De Ville. On the other hand, the rear doors on a 4-door sedan will operate the dome light switch

dome mar 11

newsletter