Author Archives: admin
IT WORKED FOR ME STOPPING A STEERING BOX LEAK WITH SPECIAL LUBE
Although my 49 steers precisely and easily, with no play or looseness at the steering wheel, my ’49’s steering gear box has always had a slow leak. I put a new gasket on the end cover a couple of years ago, but it did not improve things. Annoyingly, every month or so I’ve had to top it up.
After reading a CLC Forum thread on this subject and mulling over the suggested alternatives (all of which involve thicker oil or grease), I bought a ½ liter plastic bottle of Penrite Steering Box Lube for Vintage Cars (for anything without rack and pinion steering or power steering), an Australian-made flowable grease. It is sold in the U.S. by Restoration Supply Company in California and costs $17 per bottle, plus about $10 shipping. I ordered 2 bottles. When they arrived, I raised the front wheels off the ground, took off the left front wheel to provide better access to the steering box, and drained the oil from the steering box by removing the lower inboard bolt on the end cover. After replacing the bolt, I then removed the filler plug and squirted lube into the box by squeezing the bottle. To get it to settle in the box I had to turn the steering wheel from side to side a couple of times between squirts. One bottle was not enough to fill the box completely, so I had to use part of the 2nd bottle. It took several days before the lube totally settled, so I checked the box after every drive and topped it up. The box no longer leaks.
AN ALTERNATE VIEW ON IDLE MIXTURE ADJUSTMENT PROCEDURES
by Art Gardner
Jon at the Carb Shop in Missouri suggests a slightly different approach to adjusting the idle mixture screws on an old Cadillac carb. According to Jon, the Shop Manual’s approach of first setting the idle speed and then tweaking the mixture is backwards. He says you should set the mixture first and then adjust the idle speed to achieve the desired/specified idle speed. Jon says that on a Carter 722, the mixture screws should be somewhere between 3/4 of a turn from all the way in to 1-1/2 turns. He suggests that one should break that up into thirds, so you would have more or less discrete positions of 3/4 turn, 1 turn, 1-1/4 turns, and 1-1/2 turns. He says for a brand new engine, 3/4 turn is typically the right position. As the engine wears, 1 or 1-1/4 turn become the norm. Moreover, he says that there is almost never a need to turn a mixture screw more than about 1-1/2 or 2 turns out from closed. He says that with these relatively steep mixture needles, once you turn the screw out about that much, the mixture passageway is fully open and further turning of the screw doesn’t make it any more open (open is open, after all). I followed Jon’s advice in fine tuning the performance of the Carter 722 on my last 1949 (sadly now enjoyed by someone else) and found it to be very sound. Give it a try!
YOUR 49s HAND BRAKE
If you’ve ever wondered how your hand brake works and particularly what makes the handle “spring” forward when you turn and release it, the following should tell you everything you need to know about this arcane subject.
There are three hand brake cables in the system. The first cable runs from the under-hood end of the familiar T-shaped chrome handle at the lower left of the dash to the top of the “hand brake relay lever”. This lever is the flat rod supported by a bolt in its middle which is located just inboard of the driver’s side inner fender. The second cable runs from the bottom of this relay lever, through a rubber-coated sheath under the car to the “equalizer”, which is a V-shaped metal piece in the center of the car, just to the rear of the X-member of the frame. The third cable runs to both rear wheels from the equalizer.
Near the rear end of the second cable, just before the cable itself emerges from the its rubber outer sheath, a metal part of the sheath, about 1½ inches long, is held to the frame by a clamp on the frame’s upper flange. (This clamp is just in front of the X-member of the frame.) Just to the rear of this clamped metal part of the sheath is an integral spring, through which passes the second emergency brake cable itself. Attached at the very rear end of this second cable is a several inch long screw or bolt whose threads go through the equalizer and upon which is screwed an adjusting nut which controls the third cable’s tension.
At each rear wheel, the third (rear) cable passes through the brake backing plate, then through an integral spring and finally to the “operating lever” on the rear brake shoe. (The integral spring is very stiff, which, as mentioned below, can make it difficult to remove the cable from the operating lever.) When you pull the T-shaped hand brake handle toward you, the operating lever presses against the “strut rod” between the two rear brake shoes and which in turn pushes the shoes against the brake drum. When you release the handle, the three springs mentioned (one at the second cable, two at the rear wheels) as well as the brake shoe springs themselves, cause the rear brake shoes to release and the T-shaped handle in your hand to move forward.
Tip: if you buy a second-hand strut rod, make sure that it is for a’49 as there is much variation in these between model years even though they are similar in appearance. For example, the ’48 rod is different from the ’49, while the ’49 left and right rods also fit 1950-52 Series 75 cars and all 1953-55 cars.
Speaking of emergency brake cables, when working on the rear (or secondary) brake shoe on the back wheel while doing a brake job have you ever struggled disconnecting and reconnecting the cable to the emergency brake operating lever? In my experience, the cable’s powerful spring sometimes fights back tooth and nail. So much so that the last time I did this it took me a long time to get both cables re-connected after lots of tries and choice words. Eventually, I had to loosen the emergency brake adjusting screw to make the job easier.
As a young guy I worked in a garage doing brake jobs and did this several times a day. In those days it was a breeze, so what happened in the intervening years? With age, either the springs got stiffer or my hands got weaker. So, if you’re an old guy like me, a better way to deal with the cable and spring is to leave it connected to the operating lever and, instead, detach the operating lever from the brake shoe at its upper end by unscrewing the bolt, nut and spring washer which hold it to the brake shoe. Then, after the brake shoe is re-lined, bolt the operating lever back on.
THE INFAMOUS HYDRO-LECTRIC SYSTEM PART I
Mention Hydro-lectric system to anyone who even knows what they are and you’ll get mixed reactions; mostly negative. It’s not that these systems didn’t work well; in fact, I’ve seen some that work as well, if not better, than a “modern” system! The problem(s) arise from lack of proper maintenance, long periods of storage, or a combination. My first experience with Hydro-lectric systems was in 1989 when I undertook the restoration of a very rough 1948 Cadillac convertible. The entire system on the car needed rebuilding, as the vehicle had been in storage for many years and time took its toll. After many hours of labor, an endless litany of expletives I can’t repeat here, and a serious cash outlay, I found, much to my astonishment and satisfaction that everything actually worked! In fact, the gentleman who bought the car in 1990 reports that the system still performs flawlessly!
Cadillac, various other GM makes, and other car manufacturers had been using the Hydro-lectric system since the early 1940s. At least in 1949, which I’m most familiar with, the system was standard equipment on the 60 Special, convertible, Coupe De Ville, and some models in the 75 series. It was an extra-cost option on the Series 62 sedans and coupes, but since it was rather “pricey” at $121.65, few Series 62 buyers opted for it. The system was used until 1953, when electric power windows appeared on all vehicles.
The Hydro-lectric system was revolutionary when it was introduced, and a veritable marvel of engineering, especially considering it was designed and executed way before the days of CAD (Computer Assisted Drafting). It’s also an extremely ingenious system that with proper maintenance could, and would, operate satisfactorily for years. Essentially, the system consists of a pump, typically mounted on the fire-wall, electrical switches, hydraulic cylinders mounted in pivoting frames with a large spring or springs, a closed loop of metal lines and rubber hoses, and a wiring harness. It powered the windows, the front seat and, on convertibles, the top.
The Achilles’ Heel of this system was the use of brake fluid as a medium. Since brake fluid starts attracting/ developing moisture the moment the bottle is opened, after years of inactivity it coagulates into a pasty, sometimes rock-hard consistency, clogging the lines and seizing up the pump and cylinders. This necessitates a rebuild of the pump and replacement of the cylinders; not an inexpensive proposition! This is why, in the owner’s manual, it’s stressed that all power equipment (seat, windows and top) be operated at least once monthly to “keep things flowing.”
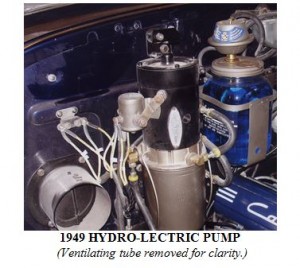
Here are the principles of operation: the Hydro-lectric pump, comprising a motor resembling a starter, a housing containing two “rotors” in a cavity which pump the fluid, an electrical solenoid, and a reservoir at the bottom portion to hold the fluid, is mounted vertically on the firewall with three rubber “cushions.” Also mounted on the firewall, near the pump, is a circuit breaker to protect the wiring from overload or shorts in the circuit. A rubber hose (or two hoses if it’s a convertible) runs from the pump to a network of metal tubing and additional rubber hoses that go to the power seat, windows, and convertible top. Inside each door is a metal frame containing a hydraulic cylinder held in place with special clips, and either one or two very strong springs. The upper part of the frame has scissor-like arms which attach to the window channel. In each door pillar is a rubber hose which allows flex when the doors are opened and closed. On convertibles, two metal lines, with loops in them to allow for movement, are attached directly to the large cylinders that operate the top. One line goes into the top of each cylinder, the other to the bottom, so that the cylinder piston rod can either extend or retract, thereby raising or lowering the top.
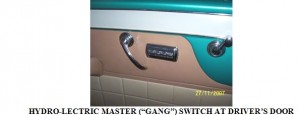
A “gang” or master switch, containing four individual switches, is mounted on the driver’s side front door panel. This is used to control the four windows. When a window switch is pushed upwards, the circuit is completed, powering the motor on the pump, which then pumps fluid to the appropriate cylinder and raises the window. When the window switch is pushed downwards, an electrical solenoid at the bottom of the cylinder is activated, and a valve opens. The springs then gently, and quietly, pull the window down, forcing the fluid out of the cylinder, through the lines, and back to the pump reservoir. The power seat, which operates similarly, has its own switch.
HYDRO-LECTRIC MASTER (“GANG”) SWITCH AT DRIVER’S DOOR
On convertibles, an actuating rod with a knob labeled “power top” goes through the firewall and is attached to a Bakelite power top control valve. This is essentially an electrical switch and valve unit. When the power top rod is pushed in, or pulled out, the top portion of this unit rotates. Inside the unit is a spring which returns the rotating part to its “neutral” position, and circular copper strips. When the power top rod is pulled or pushed, the rotating portion will swivel, thereby completing the circuit and actuating the pump. As the top portion of the control valve is rotated, it also opens one of two ports, diverting the fluid either to the bottom part of the top cylinder, thereby raising the top, or to the upper part of the cylinder, lowering the top.
Sounds simple, doesn’t it? In the next installment, I’ll get into the more technical aspects of this system, such as the wiring of the switches, rebuilding the system, and troubleshooting techniques.
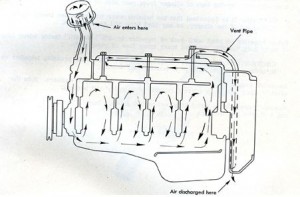
DIAGRAM OF THE 49 ENGINE VENTILATION SYSTEM
When Car Moves Forward, Air Going Past The Beveled Tip Of The Vent Pipe Creates A Slight Vacuum Which Draws Air Into The Oil Filler Cap And Forces Gases From The Crankcase Into The Vent Pipe
THE ROYAL FAMILY WELCOMES A NEW MEMBER
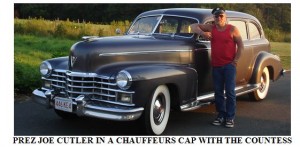
Have you heard the news that the Royal Family recently added a new baby to the regal flock? This would mean that Prince Williams’ lovely bride “had a cake in the oven,” as my late Mom jokingly referred to a pregnancy out of wedlock! I’m sorry to disappoint you, but the Royal Family I’m referring to doesn’t reside in Buckingham Palace, but rather in my garage. The fateful day occurred in March of this year when the phone rang and a gentleman named John Raftery, a longtime CLC and Forty Niners member from Jamaica Plain, Mass., asked me if I knew of anyone in the area who could do some mechanical work on a 1949 Cadillac 60 Special he owned. I told him I’d make a few calls and get back to him. As we continued our conversation, John mentioned that he owned a second ‘49 Cadillac and was interested in selling it. “Curiosity killed the cat,” as the old adage goes! Throwing all caution to the wind, I asked him what model it was, and learned that is was a ‘49 Cadillac model 7533X 9 passenger Business Sedan, a.k.a. a limousine! I then proceeded to ask him all the “essential” questions regarding the condition of the vehicle, when it last ran, is it currently drivable, etc., etc. John explained the car had a rather interesting history. He purchased it from the original owner in the mid-seventies, an African American gentleman who had served as a chauffeur for a federal Judge who lived in the Boston area. The judge retired in 1949, and evidently was so endeared to his longtime chauffeur, that he instructed him to visit Peter Fuller Cadillac, the largest Cadillac dealership in New England at the time, and pick out any new 1949 Cadillac he desired, and the generous Judge would pay for it! Are there any wealthy judges out there looking to hire a retired Teacher turned chauffeur? I should be so lucky!
John said that he had been driving the car until one day last Fall, when pulling into his garage, he saw, much to his horror and chagrin, smoke emanating from the engine compartment. In a panic, he quickly raised the hood and emptied a fire extinguisher on the melted bundle of wires leading to the starter. Some “mechanic” had installed a 6/12 Volt converter that malfunctioned, causing this tragedy. This is when he lost all interest in the car. If this wasn’t bad enough, he had recently shelled out almost $1,000 for four new wide whitewall tires, so understandably he was pretty discouraged. Continuing our discussion, he revealed the car had run well before the fire, but wouldn’t start when the engine was hot, thus the 6/12 Volt “converter” (see “6 Volt Starting Problems”, March 2011). On a brighter note, John assured me that the car had always been garaged and was totally rust-free, it had its original interior in nice condition for its age, and was 99% complete. My curiosity piqued, I asked him how much he wanted for it, just in case I ran across “someone” interested in such a vehicle. He replied that he had no idea what the car was worth, so I promised to do a little research.
Already cognizant of the fact that this was a low production vehicle, I first consulted a fascinating book I bought in the ‘70s, “Production Figures For U.S. Vehicles” by Jerry Heasely, and discovered that a scant 626 were built! This is a pretty rare beast, I said to myself, and even rarer considering it has a factory 3-speed manual transmission! Less than 4% of all ‘49 Cadillacs came equipped with a standard transmission; most buyers opted for the 4-speed Hydramatic transmission. I then referred to the “Old Cars Price Guide” in order to get an idea of the car’s value, and concluded that it could be affordable if I could obtain it for the “right price.” Now things are starting to get “dangerous”! Finally, one Saturday morning in early April I decided to go and view the car. After all, “It doesn’t cost anything to look!” (Translate: It usually DOES!) Arriving at John’s home, I caught first sight of “Her” and, as fate would have it, it was “Love at first sight”! Here we go again! Being prepared, “just in case,” I brought a wad of cash with me; always a good bargaining tool, I’ve learned from experience. I made an offer, and after some back-and-forth negotiating, arrived at a fair price. I immediately contacted my good friend and “trailer man”, Jim Powers, and arranged to bring home the new “baby” the next weekend. With a 136″ wheel, base and a weight of 4,930 pounds, it occupied most of the trailer! Immediately after unloading Her in my driveway, I went to work doing a thorough cleaning consisting of a hand washing, vacuuming the interior, scrubbing the whitewalls, etc. After a few hours of work, She looked like an entirely different car! I then spent about six hours cutting back all the melted wiring and soldering new wires. I removed the starter and carburetor and had both rebuilt.
All this accomplished, the “moment of reckoning” was at hand. A little gas down the carburetor and She fired right up, “purring like a kitten”! I changed the oil and antifreeze, installed new plugs and wires, and embarked on the long and tedious task of rebuilding the Hydro-lectric system, as power windows, including the partition window, was standard on this model. Upon checking the data plate, I found this to be body #572 out of the 626 built, so this is a “late” one, perhaps built during the last month of production. The original color was Tyrolian Grey, with broadcloth interior in the passenger compartment, and full leather, including door panels and headliner in the chauffeur’s compartment. Besides the partition window, there are two jump seats which fold into the back of the front seat, allowing for extra passengers. The craftsmanship on this vehicle is absolutely amazing! All interior window garnish moldings are solid steam-bent black walnut, and the door handle escutcheons are gold plated! The running boards are solid stainless steel. Besides power windows, the car is equipped with optional fog lights and electric clocks in the front and rear compartments, dual undersea heaters, a deluxe radio with rear shelf speaker, dual back-up lamps, glare-proof rearview mirror, vacuum-operated power antenna and windshield washers.
I obtained a copy of the original factory invoice from GM, and learned that the car was shipped by rail to Boston on June 28, 1949. It very well may have arrived in Boston on my birthday, July 7, 1949! The total cost was $4,061.59; a LOT of money in 1949! I named Her “The Countess,” sister to my other two ‘49 Cadillacs, The Duchess and The Baroness. She is a joy to drive, and though not quick off the line, is like a locomotive once you get Her rolling, cruising effortlessly at 65-70 MPH! Long live The Queen!
AIMING THE SPRAY NOZZLES IN YOUR CARTER 722S CARBURETOR
by Art Gardner
Many of you may have rebuilt your 1949 Cadillac carburetor, the trusty Carter WDC 722S. Although the instructions in the Shop Manual are very good, in paragraph 10 on page 124 there is insufficient detail on an important tuning trick: aiming your accelerator pump discharge jets for optimum throttle response. The Carter 722S carburetor has two little dots cast into the carb body and the sprays from the accelerator pump jets are supposed to hit these targets. The Cadillac engineers figured out that when the spray hits these targets you get the best atomization of the accelerator pump spray and thus the best throttle response.
This tuning can be done while rebuilding the carburetor or simply by removing the air horn (the very top of the carb) to gain access to the accelerator pump jet nozzles. Indeed, once you take off the air horn, you have good access to the nozzles. The targets are little dots cast into an upper portion of the lower half of the carb. You just take a pair of needle nose pliers and gently bend the jet nozzles until the fuel sprays directly onto the “targets”. If there is fuel in the carburetor bowl, manipulating the rod from the gas pedal a little causes fuel to be sprayed from the nozzles and you can see if it is hitting the targets or not. The carburetor does not have to be totally disassembled or even removed from the engine to do this.
So on my own car, I removed the air cleaner and the air horn from the top of the carb and tweaked the aim of the nozzles to hit the targets exactly. It really made a difference. We also did this with Jay Friedman’s car and he reports that his car is running better than ever as a result. By the way, I didn’t figure this out myself; I found the details in an old carburetor user guide.
2011 A GOOD YEAR FOR 49ERS
Greetings and salutations, my fellow ‘49ers! As yet another year of cruise nights and car shows fades into memory, and festive holidays loom on the horizon, I find myself once again, as I do every year, reflecting on what transpired in 2011. The year started with me taking over as Prez of the ‘49ers from my friend and co-founder of the chapter, Jay Friedman. Then, in February, I was fortunate to be able to attend the prestigious Boca Raton Concours D’Elegance in Florida. In April, I was blessed with another new “baby”, an all-original, un-restored, 1949 Cadillac 7533X Imperial Business Sedan, one of only 626 built, that I found in the Boston area. (See article page 2.) Then, in June, I finally retired from teaching Junior High Industrial Arts after 37 years in the profession. I could, and probably should, write a book just on this aspect of my life, but it would have to be classified under “fiction”, as no one would believe some of the things I witnessed during my long tenure as an educator.
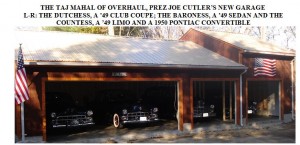
Finally, this month earmarked the fruition of one of my biggest dreams ever: the construction of a larger garage! One of my former colleagues, who also taught woodworking, along with his son-in-law, helped me in this major undertaking. We managed to complete the structure in 2 months flat, and all the “babies” are now nestled in their new home. Judging by the smiles on their grilles, they seem to like their new habitat immensely! The new facility is an imposing edifice, measuring 24 feet deep by 46 feet long, with one end bay having an inside ceiling height of 16 feet to accommodate a lift. I named the new garage “The Taj Mahal of Overhaul”, a name I borrowed from a recent Auto Zone commercial. (See photo on page 6.) But overshadowing all of this was the honor, and pleasure, of meeting many wonderful fellow aficionados of ’48 and ’49 Cadillacs, either on the phone or in person. After all, aside from our beloved cars, it’s you folks that really make this such a great hobby.
Lastly, it’s that time of year again. If you have not paid your $8 dues for 2012, please send a check for that amount, payable to Jay Friedman to 1530 September Chase, Decatur, Georgia 30033 USA. Canadians can send a cheque in their own currency equivalent to US $8, while European members can send a 5 Pound or 5 Euro note.
With that said, I extend to all of you a healthy, happy holiday season, and a prosperous New Year.
Keep ‘em rolling,
