Author Archives: admin

BIAS-PLY VS. RADIAL TIRES: A NEVER-ENDING DISCUSSION

Most radial tires change the “stance” of the car, as they are wider and of a smaller overall diameter than the original 8.20 X 15 bias ply tires. Besides the difference in appearance, the greater width of radial tires can cause two problems:

1. Greater steering effort is required when parking or maneuvering at low speeds because “more rubber is on the road”;

2. Under certain conditions the rear tires could scrape the fender skirts; for example, when rounding a curve at higher speeds.

According to one tire company official, another problem is that when going over a bump radials exert much more lateral pressure on the wheels than the original tires. Since ’49 wheels are 2 halves welded together, in extreme circumstances the car could go over a harsh bump and, allegedly, the wheel will split in two. On the other hand, many knowledgeable people say this is an old husband’s tale and that, in general, ’49 owners have no problem at all with radials; they last longer, ride better and may be safer.
A good source of radials tires is Diamond Back in South Carolina, since one of their lines of tires (possibly called “SE”) has dimensions that are closer to 8.20 X 15s than other radials; that is, they are narrower and taller. Diamond Back advertises in Hemmings, usually on or near the back cover.

If you stay with the original-type 8.20 X 15 bias-ply tires, they have their virtues, too. For one thing, until they wear significantly, many owners find that they ride very well, even at high speeds, and require less effort when parking. Secondly, bias-ply tires cost less. In fact, some suppliers occasionally sell “seconds” or “blems”, with minor blemishes on the white sidewall but no structural damage, for not much more than $100 each. Thus, while bias-ply tires don’t last as long as radials, if you don’t drive your car much, in the long run they will provide an entirely satisfactory ride, will save you money and will look authentic. So, the question then becomes, “why bother with radials”? (Personally, I use bias-plies and drive my car a lot.)

There is probably no hard and fast conclusion to this discussion, so whether you choose to use bias ply or radial tires is ultimately a matter of personal preference. If you have a an opinion one way or another that you would like to share with the rest of us Forty-Niners please email the Times at jaysfriedman@yahoo.com or snail mail to Jay Friedman’s address in the CLC Directory

newsletter

49ERS GETTING READY FOR LAS VEGAS GRAND NATIONAL

which should be a great one. Unfortunately, I won’t be able to go myself due to various other commitments, but my absence will be more than made up for by the Forty-Niners Chapter Member-at-Large, Frank Stagnitto, who will be attending. Frank has promised a full report on the GN activities of ’49s and their owners, which will appear in the September issue of the Times.

The Cadillac-Lasalle Club recently sent a flyer touting the virtues of the 2nd edition of the ’48 and ’49 Cadillac Authenticity Manual to all CLC members who are owners of such cars but who have not yet bought a copy. Get a copy of the 2nd edition of the manual by sending a $65 check to CLC Director of Technical Services, Bill Anderson 2198, Johns Hopkins Road, Gambrills, Maryland 21054-1614.

There are four Series 62 4-door sedans featured in this issue, which is only fitting as they were the most popular ’49 Cadillac mode, with 37,617 being sold or more than 40% of all ‘49s produced.

Now that summer is upon us, take your ’49 out and drive it whatever the model. That’s what they’re for!

newsletter

COME BLOW YOUR HORN

by Art Gardner

Installing my 6107’s horns was one of the last tasks to complete after getting her running. I hooked up the wires to the horns, relay, etc and tried out them out. They blew for a second or two and then quit. So I had to take the horns off and give them a “tune up” by taking them apart, filing the points (using an ignition points file), cleaning them up internally, adjusting the points to give a consistent tone, painting, etc.
The task of adjusting the points is a bit irksome, as it will annoy the neighbors! Basically, you turn the adjustment nut while energizing the horn with a couple of wires until a good sound comes out of the horn. After reinstalling the horns, all that was left was to install the horn button and horn ring. That job took a little bit of patience in order to make the system work reliably, as described next.

To get the horn ring and button working right, I first had to adjust the longitudinal position of the steering shaft relative to the steering column. This was because I had changed this positioning inadvertently as part of the installation of a rack and pinion steering unit. This is not necessary on cars with stock steering.

Next came the task of trying to find the right replacement for the fiber washer that originally was fitted under the little contact at the top of the steering shaft. As you can see in the schematic below of a generic Cadillac steering wheel, the horn button (7.3785) is held away from the steering shaft by a conical spring (7.3796) which rests at its small end against the nub of the contact (7.3820).
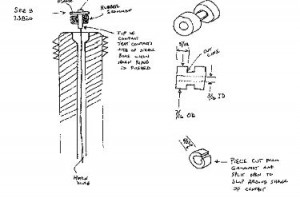
The contact has a flange and a shank (not seen in this parts diagram). I thought that the horns were energized by the flange of the contact touching the top of the steering shaft. But that is not the usual manner of blowing the horn. Instead, the flange is held slightly away from the top of the steering shaft by the washer, even against the force of the horn button spring. When the horn ring is pushed, it causes the contact to tilt slightly in the same direction as the horn ring. The lower tip of the contact apparently then touches the inner wall of the steering shaft, completing the circuit. See my sketch (not to scale and a little rough, but you will get the idea). The trick then is to come up with a decent replacement for the washer that will be thick enough to keep the flange from contacting the top surface of the shaft and yet will allow the horn to blow when the horn ring is tilted. Jay Friedman told me that some folks take a small rubber band and wrap it around and around the shank to make a replacement. I tried that, with poor results. The car had an O-ring on there as some previous owner’s attempt at a repair, but it wasn’t doing the job.

What I came up with is a bit of rubber grommet as shown in the drawing above. I cut the grommet with a scissors to make a suitable collar to wrap around the upper part of the shank of the contact. To slip it over the shank without removing the horn wire from the shaft, I simply sliced it lengthwise (split it) with the scissors. Since it is captured in the bore, the split in the rubber is of no consequence. I found that a grommet with a 3/16″ ID worked well. Alternatively, a bit of rubber hose with a similar diameter would work as well. It takes some careful trial and error to get the length of the rubber /grommet just right, but I managed in 4 attempts. The set up works well and my car has working horns for the 1st time in 2 decades

newsletterjune 09 horn1

june 09 horn2

VENDOR TIP

I used Paul’s Chrome Plating, Evans City, PA, to re-chrome 50 smaller pieces (not the bumpers or grill) on my Series 62 4-door. Paul’s estimated 8-weeks and delivered in 8 weeks. Each piece of chrome is beautifully done. They were a pleasure to work with. When I delivered my chrome to them, they gave me a super hour-long tour of the entire operation! Very impressive. I’ve heard so much about chrome plating problems that I thought it might be of value to let chapter members know of this totally positive experience

newsletter

TWO WISCONSIN COUPES, OF WHICH ONE IS A DE VILLE

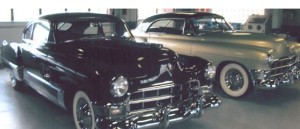
Most of us Forty-Niners have only one ’49 Cadillac, but 28 chapter members, including Jack Hoffman of Horicon WI, are lucky enough to own two or more. On the left in the photo below is Jack’s dark green 6207, whose motor is stock with Hydra-matic. To the right is Jack’s classy Coupe de Ville, about which he writes, “It’s almost finished. The car is now stick shift with the regular side shift box and the correct steering column. I have `55 heads and dual carbs along with a “hotter” cam. However, I may convert it back to stock, but am torn between the two possibilities. I have not yet built the exhaust system which will depend on the final engine status. This lack of exhaust confines the car to the shop.”

june 09 wi

newsletter

MYSTERIOUS NETHER NOISES IN A 49

During the 24 years I’ve owned my 6107, it has been afflicted at least twice with a mysterious noises emanating from somewhere underneath the car. In both instances, though I continually tried to figure out where the sounds were coming from, and asked every knowledgeable car guy of my acquaintance for their advice, it was only when I finally consulted a local shop that specializes in this sort of thing that the problems were resolved.

The establishment in question is Doraville Driveline and Spring, located not far from my house in the Atlanta suburb of that name. (No telling who “Dora” was.) DD&S is one of those old time establishments, kind of mysterious and dark, filled with lots of neat looking older machinery and staffed by a bunch of guys who live and breathe drivelines, springs and related components.

The first set of noises that existed from the time I bought the car until 16 years ago was a cacophony of creaks and groans that came from somewhere underneath whenever I started out from a stop or took my foot off the accelerator pedal. It was all the more embarrassing when a sound video made at the CLC Grand National in Lancaster PA in 1993 had a shot of my car starting to roll with the aforementioned noises loud and clear. Chapter member Bob Knutson, who lives nearby, recommended DD&S, whose manager told me that replacing my rear leaf springs would cure all these ills. A new pair was ordered from the Triangle Spring Company in Pennsylvania and then installed. Following this operation, my ’49 stayed quiet for some years.

Then, about a year ago, my car’s gear shift lever began to rattle at high speeds. (Manual transmission ’49s like mine don’t have the same anti-rattle spring for the gear shift lever as Hydra-matic cars.) Taking a shot, I replaced the motor mounts, then took out the clutch which I had rebuilt and balanced, but the annoying rattle persisted.

When I drove to the Grand National in Cherry Hill, New Jersey last August, not only did the rattling become worse, but it was joined by squeaks and clanks from under the car that would come and go for no apparent reason. Though these sounded like a discordant symphony orchestra, looking under the car did not reveal anything amiss. As you can imagine, every CLC’er present at the Grand National whose opinion I sought had a different theory. One evening, with my patient wife holding the tools and several other GN attendees supervising, I took off both rear brake drums to check for broken brake springs, but they were fine. I then tightened all the rear stabilizer and exhaust system bolts. Nothing changed.

Meet Chairman Jack Hotz then arranged an appointment for me and my ’49 at his favorite garage, Majic Auto Repair in nearby Haddonfield. Raising the car on his lift, Majic’s owner could not detect a definite fault, though he was convinced the problem was with either the driveshaft or the clutch throwout bearing.

Back home, I finally did what I should have done in the first place and drove the car over to Doraville Driveline and Spring. Like Majic back in NJ, the manager thought the problem was the driveshaft, so he climbed under the car to closely examine it. He said no one part of it was in very bad condition, but the front and rear universal yokes and both universal joints were somewhat worn, which cumulatively added up to lots of wear and caused all the sounds. Also, the driveshaft tube itself was full of dents and dings, rendering it out of balance and causing the gear shift lever rattle.

A phone call bought a NOS front yoke from Ted Holcombe Cadillac Parts which I had shipped to DD&S. Meanwhile DD&S had in stock a used dent-less driveshaft tube with a perfect rear yoke along with new universal joints. DD&S put all these together. When I installed the rebuilt driveshaft in my Cad and took it for a ride all its noises were gone. Another lesson learned.

newsletter

THE EARLIEST EXTANT 49

First some background info: 1. Ray Anderson of Edgewater, Florida owns a beautiful, prize-winning ‘49 Model 7519 limousine, a photo of which graces page 2 of the September ’07 issue of the Times; 2. According to Cadillac guru and chapter member Ed Gunther in an article in the December ’02 issue of the Times “The first twenty 1949 Cadillacs manufactured in November 1948 were Series 75 limousines”.

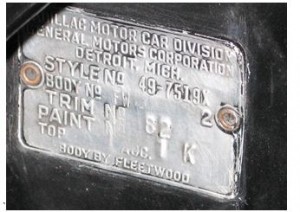
As can be seen in the photo below of Ray’s car’s body data plate, it is body number 2 of all 1949 model 7519s built, so it is probably one of the first twenty ‘49s, if not the second ’49 overall! Absent other evidence to the contrary and unless “Number 1” shows up somewhere, it seems that Ray’s car may very well be the earliest extant ’49 Cadillac.

early 1 mar 09

early 2 mar 09

newsletter

SEMI TECH TIP

When I installed a new directional signal flasher to see if I could breathe new life into my squirrelly directionals, I discovered that the prongs had to be just so in order for the flasher to squeeze into the socket. Otherwise mashing the two together might do some damage. I just closely eyeballed the prongs on the old one and the new one and bent as needed. They were just different enough to prevent an easy install.

newsletter

BEWARE NON STEEL HEAD GASKETS

For a couple of years my 6107’s engine had been getting tired, as it began using oil and developed low compression on two cylinders. To rectify matters, while at Hershey in October 2007 I bought a low mileage ’49 motor from chapter member Fred DiGiovanni which I helped a more expert friend rebuild. Though the crankshaft was in perfect shape, prudence dictated .installing .020 inch oversize pistons and rings, a new camshaft, new valve lifters and re-building the cylinder heads.

However, we made the mistake of installing head gaskets made of a new, black composite material instead of the usual old-style steel gaskets. After starting, the new engine ran well but the water temperature ominously seemed to be higher than that of my old motor, hinting at faulty head gaskets.

Sure enough, a few days later I took the car out for a high speed test run and my worst fears were realized when the passenger’s side gasket blew. As I was on an interstate I couldn’t slow down very quickly, so the motor got very hot. This in turn caused a Welch (freeze) plug in the block to pop out, spilling out all the coolant and bringing the car to a disastrous halt. I had to replace the plug and both cylinder head gaskets, a lengthy job which included flushing a mixture of oil and water out of the crankcase. Luckily there was no other damage done. My ’49 is now backing on the road, again running cool and fine like a Cadillac should.

newsletter

CHASING DOWN THOSE ELUSIVE EXHAUST NOISES

Figuring out exactly where an exhaust noise is coming from is sometimes tricky. If the location of the leak is not apparent by sound alone, a first step is to visually check the manifolds and pipes to make sure there are no small cracks or breaks visible. Then, if nothing can be seen, start the engine and have an assistant run it at various speeds while you run your hand near (don’t touch!) the exhaust manifolds and, from under the car, the crossover and exhaust pipes. You can sometimes feel the hot air escaping. If still no luck, another way to possibly detect the leak is to run the engine, then pour a bit of Marvel Mystery Oil or ordinary engine oil in the carburetor and look for smoke coming out of one of the above mentioned points.

Assuming the source of the leak is still elusive, the next step is to unfasten the six manifold bolts on each side of the motor so that, using a large screwdriver or pry bar, you or an assistant can pry each manifold a small distance away from the corresponding cylinder head. Then, using a mechanic’s mirror and light, the other guy can visually check that there is no corrosion on the surfaces where the manifold mates to the cylinder head which may cause a leak that even a gasket can’t contain.

A more involved procedure is, after removing them from the motor, to check the surfaces of the crossover pipe and its flange, the heat riser and the outlets of the manifolds (particularly around the studs) for the same defects, as these are susceptible to cracking and corrosion when they get old. Also, the heat riser can develop an exhaust leak not necessarily via a crack, but through the shafts supporting the butterfly valve which extend into holes in the heat riser body. Because of this very problem, I replaced mine with a spacer. (As I live in a mild climate, my engine warms up well without the hear riser, even in the winter.)

By the way, you must have a heat riser or a similarly dimensioned spacer in its place, since the crossover pipe is engineered with the correct angles and to be just long enough to reach between the outlet of the left manifold and the inlet of the right manifold. This pipe is quite rigid, so it is almost impossible to bend it to reach the manifold in the absence of the heat riser or a spacer. In such a case, the angle of the end of the crossover pipe and its flange would not be parallel to the surface on the manifold it mates to, causing an exhaust leak.

If you still can’t isolate the exhaust leak, another possibility is that there is an exhaust leak where the INTAKE manifold’s center arm joins the cylinder head, caused by either a fault in the intake manifold or a bad gasket. This passage provides heat to the carburetor from exhaust gases to hasten warm-up (and which is regulated by the heat riser). This happened to my motor some years ago and took a long time to diagnose as it is not something one would expect.

newsletter