Author Archives: admin

LOST AND FOUND

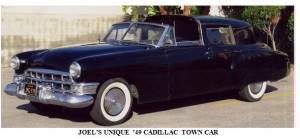
Many ’49 Cadillac fans are aware there was a town car and 2 passenger coupe built for Mrs. Morgan Adams of Pasadena CA. There are pictures of them in both standard books on Cadillacs. Features of these cars include a formal roof treatment with a small rear window, fins removed as well as body bright trim and insignia removed.

I spent part of my childhood in Pasadena, saw these cars as I rode my bicycle, fell in love with the town car and got acquainted with the owner. The car was sold in the ‘60s, then “disappeared” for 40 years. I now have acquired the car. I submitted a complete article on it for the Self-Starter, but thought ’49 fans might like a “heads up” on this information regarding one of the most unique ’49s. The 2-passenger coupe, on the other hand, was “modernized” in the 1960s and remained in the original family for 50 years. It has been restored back to its original appearance by a new owner.

lost found dec09

newsletter

THE RESTORATION OF MY 49

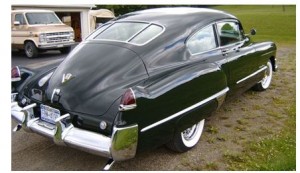
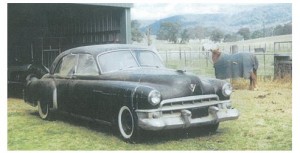
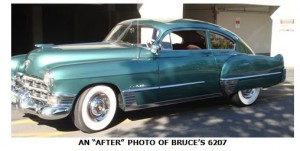
I acquired my 49-6207 in June/July of 2007, commenced the restoration process in February 2008 and completed it in September 2009. In actual fact the story is much longer than that. My very first car was a 1940 LaSalle in high school and later I had other cars, but underneath all was a fascination with 1948 and 1949 Cadillacs, especially the Club Coupe. As a college student an older neighbor had a 48-6207 in dark green metallic, which was always pristine with its wide whitewalls, Sombreros and “Rainbow” dash. Though I lusted after that car, it was never for sale, so life moved on. “It” was “sacrificed” on the altar of wives, kids, houses, careers etc., but that’s when “it” started.

As the years went by that iconic 61/6207 Coupe “stuck” in my head, so I scanned the magazines for interesting candidates, but most were too far away or too something. Then I came upon a ’49 6207 close to home in Sandy, Oregon, which demanded investigation. Its second owner, a 75 + year old gentleman, had purchased it from the estate of its original owner in California over thirty years before. Anyhow, he determined that I knew a bit about Cadillacs and would not make it into a Street Rod but, sadly, the price was too high. Less than a month later I received a call from him stating that he had sold his house and was retiring to Idaho. The price for car and many spare parts was too good to let go and was conditional upon my “swearing” not to make a mess of the car.

Before I began the restoration, I re-joined the CLC and purchased the shop and authenticity manuals for the car, which I strongly recommended to anyone commencing a restoration. The “49ers, especially Joe Cutler, bailed me out of numerous detailed sticking points, as well as Cliff Houser (locally) whose French Grey 49-6207 is featured in “Cadillacs of The 40s”. Also, Ed Cholakian helped fill many Steele rubber orders and sort through pesky details like non functional fuel pumps, wiper motors and others.

The actual process began with media blasting the car to bare metal. There was no rust but the “dryness’ had a down side as all the rubber parts were done for. Though the body was damage free, there was a fair amount of effort devoted to clearing up the many little dings, ripples and such. Research in the first edition of the Authenticity Manual showed that the cowl tag paint number indicated the original color was # 16 “Lucerne Green –Metallic”, of which samples were discovered beneath some undercoat in the rear fender wells. This was replicated with especial care and attention given to getting the metallic aspect correct for 1949 with DuPont Chroma Base Coat-Clear Coat urethane.

Then it was time to look at the interior, which coincided with the publication of the 2nd edition of the Authenticity Manual. Luckily for me, the manual had numerous detailed shots of a ’49 with the same interior option, #43, as mine; that being Chocolate Brown wool broadcloth with taupe Bedford Cord. SMS in Portland OR was not only able to furnish the correct upholstery, but the correct brown “vinyl” for the package tray, rear seat backs, front kick panel and door arm rests. The trunk was another matter, as no one locally could relate to the “Oyster” colored hopsack pattern material. But the value of the Club came through again, as Joe Cutler and I traded some parts I had for this material. The rest is history.

The engine was not rebuilt, as it had been done less than 17,000 miles before, though it was in serious need of a complete tune up. I thought the transmission was bad due to hard shifting, but this was due to the fluid level being 3 quarts low and the carburetor “kick-down” rod being totally out of adjustment. A ‘49 Times article and the Shop Manual sorted these out. The “slow starter” was due to an incorrect (too small diameter, 12 volt?) positive battery cable which was corrected, along with a new starter solenoid. The 6 volt starter now gets the job done. It’s amazing what happens when you use the correct parts. So now I have a good-running example of a 49-6207. The previous owner contacted me to offer his family’s approval for bringing the car back to its intended level.

Modesty aside, I’m pleased with the outcome. Again, it could not have been achieved without the help of a lot of people within CLC and the ‘49ers. Even in a sad state these cars are beautiful iconic design pieces. Hopefully this one can take its place among the other great examples that helped me through the process.
resto after dec09

newsletter

A TAIL LIGHT TALE

by Art Gardner

My wife and daughter were following me home in my 6107 one night and reported that one of my tail lights was brighter than the other. At first I disbelieved them, but then thought they must be looking at one of the lights from not quite straight on. As you know, the tail light lenses have a focuser in the middle that creates a rearward beam, so I figured they each thought the one in front of them was brighter. However, checking myself I found they were correct: the left light was brighter. Switching the lenses from one side to the other didn’t help and I then noticed the bulb filament on the left lamp was lined up with the center of the focuser part of the lens, while the bulb filament on the right lamp was positioned noticeably below the focuser. As a result the focuser on the left lamp was getting a stronger dose of light than the right one.

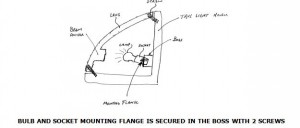
Anyone run into this before? For the life of me, I couldn’t think of how you would adjust the position of the bulb relative to the lens…… Well, I think I have the answer. It appears the mounting boss into which the tail light socket is mounted is positioned below the “beam focuser” part of the tail light lens. To position the lamp at the level of the focuser, the factory made the mounting flanges on the sides of the sockets to be not perpendicular to the sockets, but canted at an angle. This points the bulb upward such that the filament is lined up vertically with the beam focuser. When I restored the housings, I must have installed the right side socket upside down, so that it points slightly down instead of slightly up. That caused the filament to be well below the level of the beam focuser, such that not as much light was traveling straight back through the beam focuser portion of the lens. I switched this around by undoing the two screws that secure the socket and twisting the socket 180 degrees. Now it lines up correctly. Here is a schematic drawing (exaggerated a little and not to scale) of what I am talking about. The moral of the story is that it appears that there is a correct orientation for installing the sockets (and an incorrect one).
BULB AND SOCKET MOUNTING FLANGE IS SECURED IN THE BOSS WITH 2 SCREWS

tail light dec 09

newsletter

FORTY NINERS DESCEND ON HERSHEY

A contingent of ‘49ers, including Dennis Akerman, Paul Cichon, Randy & Susan Denchfield, Horace DiTecco, Jay Friedman, Art Gardner, Dan Gardner (all the way from Scotland), Rege McDonough, Jim Murdoch, John Pontarini and yours truly (and, no doubt, others too.) made the annual pilgrimage to the Mecca of the old car hobby, Hershey, October 6-10. A few of us arrived Tuesday, the 6th, in fine weather, while most of us arrived Wednesday and were “treated” to blustery, chilly conditions and dark, threatening skies. Art Gardner arrived late that day, having driven his ’49 Club Coupe, “The Cadster”, 750 miles from Georgia without incident, with hopes of selling his pride and joy in the massive car corral.

As Thursday dawned with fair weather and sunny skies, Jay and I donned our walking shoes and embarked on the daunting task of covering the many acres of the swap meet in a quest for those elusive ’49 Cadillac parts, while Art stationed himself at his car to wait for prospective buyers. The pickings were good, and by day’s end we had succeeded in filling to overflowing a “granny” cart and kid’s wagon with sundry ’49 parts. Meanwhile Paul Cichon, owner of a gorgeous ’49 hearse named Morticia, was successful in finding a rare and beautiful Miller-Meteor factory brochure depicting all models of hearses offered in ’62 and workmen performing the conversions and body drop.

Friday commenced with a light drizzle, which fortunately dissipated by late morning, followed by bright sunshine, all too often a scarce commodity at Hershey. Having successfully traversed the remaining flea market fields, we rendezvoused at the CLC hospitality tent where we were treated to coffee, soda and various snacks, including peanuts served in a ’49 sombrero hub cap courtesy of ‘49er Bill Edmunds and his wife Jay Ann. The conversations, of course, centered on our favorite passion and it was a wonderful opportunity to for a reunion with other CLC members. Art G. announced the bittersweet news that “The Cadster” had indeed been sold, and was on its way to a new home in Connecticut.

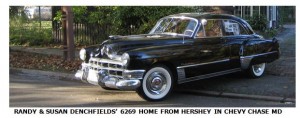
On Saturday, the final day, we attended the AACA National Show, under overcast skies but with mild temperatures, where we viewed a multitude of beautiful antique autos from all eras, including many rare, one-of-a-kind makes. ‘49ers Randy and Susan Denchfield entered their very nice, original, un-restored 6269 4-door with only 39,000 miles in the Historical Preservation Original Class. Also seen was a Belden Blue ’49 convertible from Pittsburgh which was restored in 1995 but appeared to have just come out of the shop. All in all, it was a successful meet, the weather cooperated and a “sweet” time was had by all.

hershey dec 09

newsletter

FORTY NINERS FIND STUFF THEY HAVE TO HAVE AT HERSHEY, THE WORLD’S BIGGEST OLD CAR FLEA MARKET & CAR SHOW

If you’ve ever been to this great event, which takes place in October near Harrisburg PA on the grounds of the chocolate company, you know the headline is not an exaggera¬tion. At most car shows you’ll see everything you care to in an hour or two. Not Hershey, where it’s impossible to visit all of the thousands (really!) of vendor’s spaces, if for no other reason than you can spend all your time visiting those who only sell Cadillac parts. I went to Hershey with ‘49ers Joe Cutler and Art Gardner October 6-10. After 3½ days I found some neat ‘49 stuff, and went through the car corral where there were hundreds of great cars for sale and several I had to have. (You know the feeling.) Upon departing, I was cheered by the thought that next year I’ll be doing it all over again. Below is Joe’s article on Hershey from a ‘49ers perspective.

It’s that time of year again: 2010 dues are due. If you haven’t yet paid your $8 dues for 2010, you will receive a post card in the mail reminding you to do so. To make a payment, please enclose the post card and an $8 check payable to Jay Friedman in an envelope and mail it to me at: 1530 September Chase, Decatur, Georgia 30033 USA. Canadian members can send me cheque in Canadian Dollars at the exchange rate of the day for 8 US Dollars. Members in the Euro Zone can send a 5 Euro note. If you don’t get a post card, your 2010 dues are paid and you can enjoy another year of the Times, which appears every March, June, September and December, without further ado.

May all Forty-Niners have a Merry Christmas or Happy Hanukah and Happy New Year and anything else you might celebrate this time of year, and may your ’49 (or ’48 or’50) always start quickly and run sweetly.

newsletter

NIFTY NEW YORK CLUB COUPE

Pete Hoffman of Danville, New York owns the beautiful 6107 shown below. To jazz it up, he installed dual exhausts and wire wheels (from a ‘50s El Dorado?) As for its color, Pete writes, “It is Dartmouth Green but looks black

ny coupe sep 09

newsletter

MORE ON BIAS-PLY VS. RADIAL TIRES

Members will recall that in the June ’09 Times issue we had an article on the “never-ending” discussion regarding original bias ply vs. radial tires on a ’49. Since then Dwight Smith and Dennis Akerman, both of the “Live Free or Die” state of New Hampshire, have written in with their views on this subject, as follows:

Dwight says that his 2 cents worth is “At the start of the 2001 season I put a new set of bias ply tires on the car (49,217 miles) and I removed them at the end of the 2007 season (59,950 miles). During the 10,733 miles I drove during this period, including a trip to Dearborn, MI, my car was difficult to steer when parking, and out on the road seemed to follow the grooves and cracks in the road. It was difficult to stay on course as the tires seemed to have a mind of their own. And my usual gas mileage was 15 mpg.

At the start of the 2008 season I installed a set of American Classic P235/75R15 radial tires with 3 1/8″ whitewalls. The change in handling was dramatic. Standing still steering is easier, and the car follows the path that I choose out on the open road. I ran the tires 1,547 miles in 2008 (including the 1,000 mile roundtrip to Cherry Hill) and averaged 18 mpg. I am totally pleased with the radial tires, both their appearance and handling abilities, and regret that I didn’t buy them sooner.

Dennis writes “I’ve now had a couple of years’ experience with the Diamond Back radials I put on my ’49 6269. I can’t say enough good things about them. They look authentic, they’re quiet, and the car handles infinitely better than it did with bias ply tires. It is night and day, and for the better.

newsletter

A SIXTY SPECIAL IN SYDNEY

Robert Mitchell, of that lovely Australian city, owns the 60S shown below (and perhaps the horse behind it, too). Robert writes the car was owned by an elderly man who “lost interest in the car to the extent that it just sat from 1975 to 2000, though I would occasionally start it for him. The car was not preserved very well, with possums, cats and moths making a home for them-selves. Unfortunately, he passed away and I bought it from his estate. It’s a complete, original car except for seat covers. The motor runs well and it has been converted to right hand drive. The window lifts are not working, it needs chrome work and there is surface rust on the body. I have not done a lot to it since I’m working on other Cadillacs.”

sysdney 09

newsletter

REMOVING AN OUTSIDE FRONT DOOR HANDLE

A special tool is not needed to remove an outside door handle on a ’49 Cadillac. The outside door handles are attached to a 3 or 4 inch long square shaft that is perpendicular to the axis of the handle and which goes into the door. Inside the door, the male shaft goes into a square female hole in the door latch mechanism. This male shaft is held into the female hole by a lock screw that is, in turn, perpendicular to the axis of the shaft. On early ’49s the screw has an ordinary slotted head. On later cars the screw is really a small bolt with a ¼ inch hex head.

Let’s assume it is a front door. (Sedan rear doors should be the same. Can anyone enlighten?) To access the screw/bolt, peel back the rubber weather-strip on the side of the door at a point slightly above the level of the door latch. In doing so, you will uncover a small hole in the door about a ½ inch in diameter.

Shine a flashlight into the hole so you can see the screw head, which is 2 or 3 inches down inside the door. This will reveal whether the screw head requires a screwdriver or a ¼ inch socket. If it requires a ¼ inch socket, the hole is sometimes too narrow in diameter to admit the socket into the hole. If this is the case, enlarge the hole with a file or use a ¼ inch nut driver which has a narrower head than a socket.

With one hand on the door handle, loosen the screw just enough to free the door handle and pull it out of its place. Do not loosen the screw any further, as it may come out of the threads in the door latch and fall to the bottom of the inside of the door. To retrieve it you would have to take apart the door or, if it is a slotted screw, replace it using a magnetic screwdriver, both of which procedures you obviously want to avoid.

newsletter

A MASSACHUSETTS CONVERTIBLE

Chris Crowley of Beverly MA owns the convertible pictured above. Chris writes that “we are replacing all of the original hydraulic hoses and lift cylinders. I’m in dire need of a left (driver’s side) window regulator assembly. It was missing when I acquired the car.”

newsletter